Step-by-Step Guide to Crafting 1.35 Scale Sandbags out of Clay
Creating 1.35 scale sandbags out of clay is an easy and creative way to add realism to your scale model projects. Clay is a simple and cost-effective material to work with, and the results can be incredibly realistic.
In this blog post, we’ll go over the steps for making your own 1.35 scale sandbags out of clay, including the tools you’ll need, techniques for shaping and coloring the sandbags, and tips for making the most of your clay project. Whether you’re an experienced clay modeller or a beginner, this post will provide you with all the information you need to make sandbags out of clay for your next model project.
What Materials Do I Need to Make 1.35 Scale Sandbags Out of Clay?
Making 1.35 scale sandbags out of clay can be a fun and rewarding activity for those with the patience and skill to do so. All that is needed is some clay, a rolling pin, a cutter or knife, sculpting tools, molds (optional), plastic wrap, a baking sheet, aluminum foil, a small paintbrush, cotton swabs, acrylic paint, and glue.
To start, select the clay that you want to use. You can use a variety of clays in different colors, such as tan, grey, and brown. Once the clay has been chosen, roll it out with the rolling pin to create a flat sheet. Using the cutter or knife, cut out the desired shapes of sandbags. You can use molds to help create the desired shapes if needed. Once the shapes are cut out, wrap them in plastic wrap, and place them on a baking sheet lined with aluminum foil. Bake them in the oven as directed on the clay packaging.
Once the sandbags have been baked and cooled, use the small paintbrush to paint them with the desired acrylic paints. Cotton swabs and glue can be used to create any desired details on the sandbags. Allow the sandbags to dry completely before displaying or using them in any project. With a few simple steps, you can easily make 1.35 scale sandbags out of clay.
How Much Clay Should I Use for Each Sandbag?
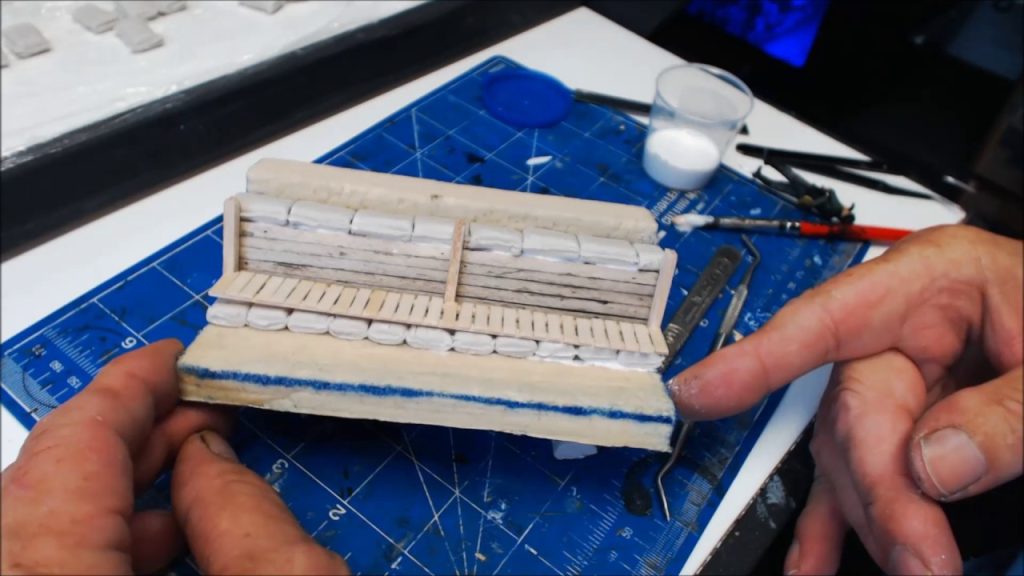
Creating a 1.35 scale sandbag out of clay is a great way to add a realistic touch to any miniature scene. Here’s a step-by-step guide on how to make one.
Start with 1/2 lb of clay for each sandbag. Roll it out into a thin, even sheet. Cut out a circle with a diameter of 2.7 inches and score it with a knife or a clay tool. Gently fold the clay in half and shape it into a rough rectangle, then flatten it out and make sure it’s even.
Next, cut out a strip with a width of 1.35 inches and two more strips with a width of 1.25 inches. Wrap the 1.35 inch strip around the 2.7 inch circle and then wrap the two 1.25 inch strips around the circle to form the sandbag shape. Smooth out the clay and trim any excess.
Finally, bake the sandbag in the oven according to the clay’s instructions. Once it’s done baking, you can paint your sandbag and use it in your projects. With this simple technique, you can easily make 1.35 scale sandbags out of clay.
What Type of Clay is Best for Making Scale Sandbags?
Making 1.35 scale sandbags out of clay can be a fun and creative way to bring your miniature scenes to life. When it comes to the type of clay to use, there are several options available. Polymer clay is the best type to use, as it holds its shape and can be baked in an oven to harden. Air-dry clay can also be used, but it takes longer to dry and can require more sanding and painting.
For smaller details, Sculpey clay is a soft and pliable polymer clay that is perfect for creating scale sandbags. Fimo clay is another variety of polymer clay that is firm and easy to work with. Apoxie Sculpt is a two-part epoxy clay that is good for making intricate details on the sandbags, and can be sanded and painted when dry.
With the right supplies and a little creativity, you can create realistic 1.35 scale sandbags out of clay. Polymer clay is easy to work with, and the other clays mentioned are great for adding extra details. So, get crafting and bring your miniature scenes to life!
What Tools Do I Need to Create the Sandbags?
Creating realistic 1.35 scale sandbags out of clay is a great way to add detail to your model or dollhouse. All you need is some soft or air-dry clay in the desired color, a knife or blade to cut the clay, a rolling pin or other tool to roll out the clay, an X-Acto knife or other sharp tool to shape and sculpt the clay, a sponge to smooth out the clay, glue to attach the pieces together, and paint and brushes to add details and texture to the sandbags.
To begin, roll out your clay to the desired thickness. You can use a rolling pin, or any flat tool that has a little bit of weight. Once you have the clay rolled out, use your X-Acto knife to cut the clay into small rectangles that resemble sandbags. The size of the rectangles should be in the 1.35 scale. Once the pieces are cut, use your sponge to smooth out any rough edges.
Also read What Tools Should a Mining Engineer Use?
Now it’s time to assemble the sandbags. Use the glue to attach the pieces together, making sure to line up the edges as you go. Once the pieces are glued together, use your paint and brushes to add details and texture to the sandbags. You can add a weathered, worn look by adding different shades of brown and gray. Once you have finished painting the sandbags, you are ready to add them to your model or dollhouse.
What Techniques Should I Use to Ensure the Sandbags Look Realistic?
Creating a 1.35 scale sandbag out of clay is a great way to add a realistic touch to your miniature diorama or model. The key to creating a convincing sandbag is to pay attention to the details and use the right tools.
Start your project by sculpting a basic sandbag shape, with a flat back and rounded edges. Use a variety of tools, such as a clay shaper, to create the look of fabric folds and wrinkles in the sandbag. Make sure to sculpt in the details, such as straps and buckles, to make the sandbag look more realistic.
Once you have the overall shape and details of the sandbag in place, use a fine sandpaper to create a weathered effect. This will give your sandbag a more aged and worn look. You can also paint the sandbag with acrylics to add depth and realism.
Finally, to make the sandbag look more authentic, add extra details such as dirt and dust. Use a drybrush technique to apply a thin layer of paint over the sandbag. This will give it a dusty, gritty look that will enhance the realism of the sandbag.
By following these steps, you can create a realistic 1.35 scale sandbag out of clay that will give your miniature diorama or model an extra level of detail.